

When Sue Bleiweiss invited me to be a contributing artist in her new book I jumped at the opportunity to participate. First, I like and respect Sue as an artist and author. Second, I love to use fusible, and when I say fusible I am ONLY referring to Mistyfuse because it is the only kind I use! It works beautifully on a wide variety of quilt and mixed media projects. I love using Mistyfuse on both cloth and paper! I work with silk organza a great deal. Nothing, and I mean NOTHING will allow your sheers to look like they are supposed to: transparent and with a lovely non-stiff hand, like Mistyfuse.
For my project in the book, a small piece called "Labels", I opted to use silk organza, a wool-blend felt for the substrate, and a wide variety of clothing labels. I wanted to show how much fun it can be to work with silk organza (in this case, a piece of my hand-dyed) as the layering possibilities are endless. I discovered how cool it is to cut two different shapes from (as it turns out) two different die cutting systems and create an entirely new look.

"Labels"
First, I pressed the felt, organza, and the clothing labels so they were as crease-free as possible.
I applied Mistyfuse to the surface of the felt and the "wrong side" of the organza by placing a Goddess Sheet under and over the surfaces of each.


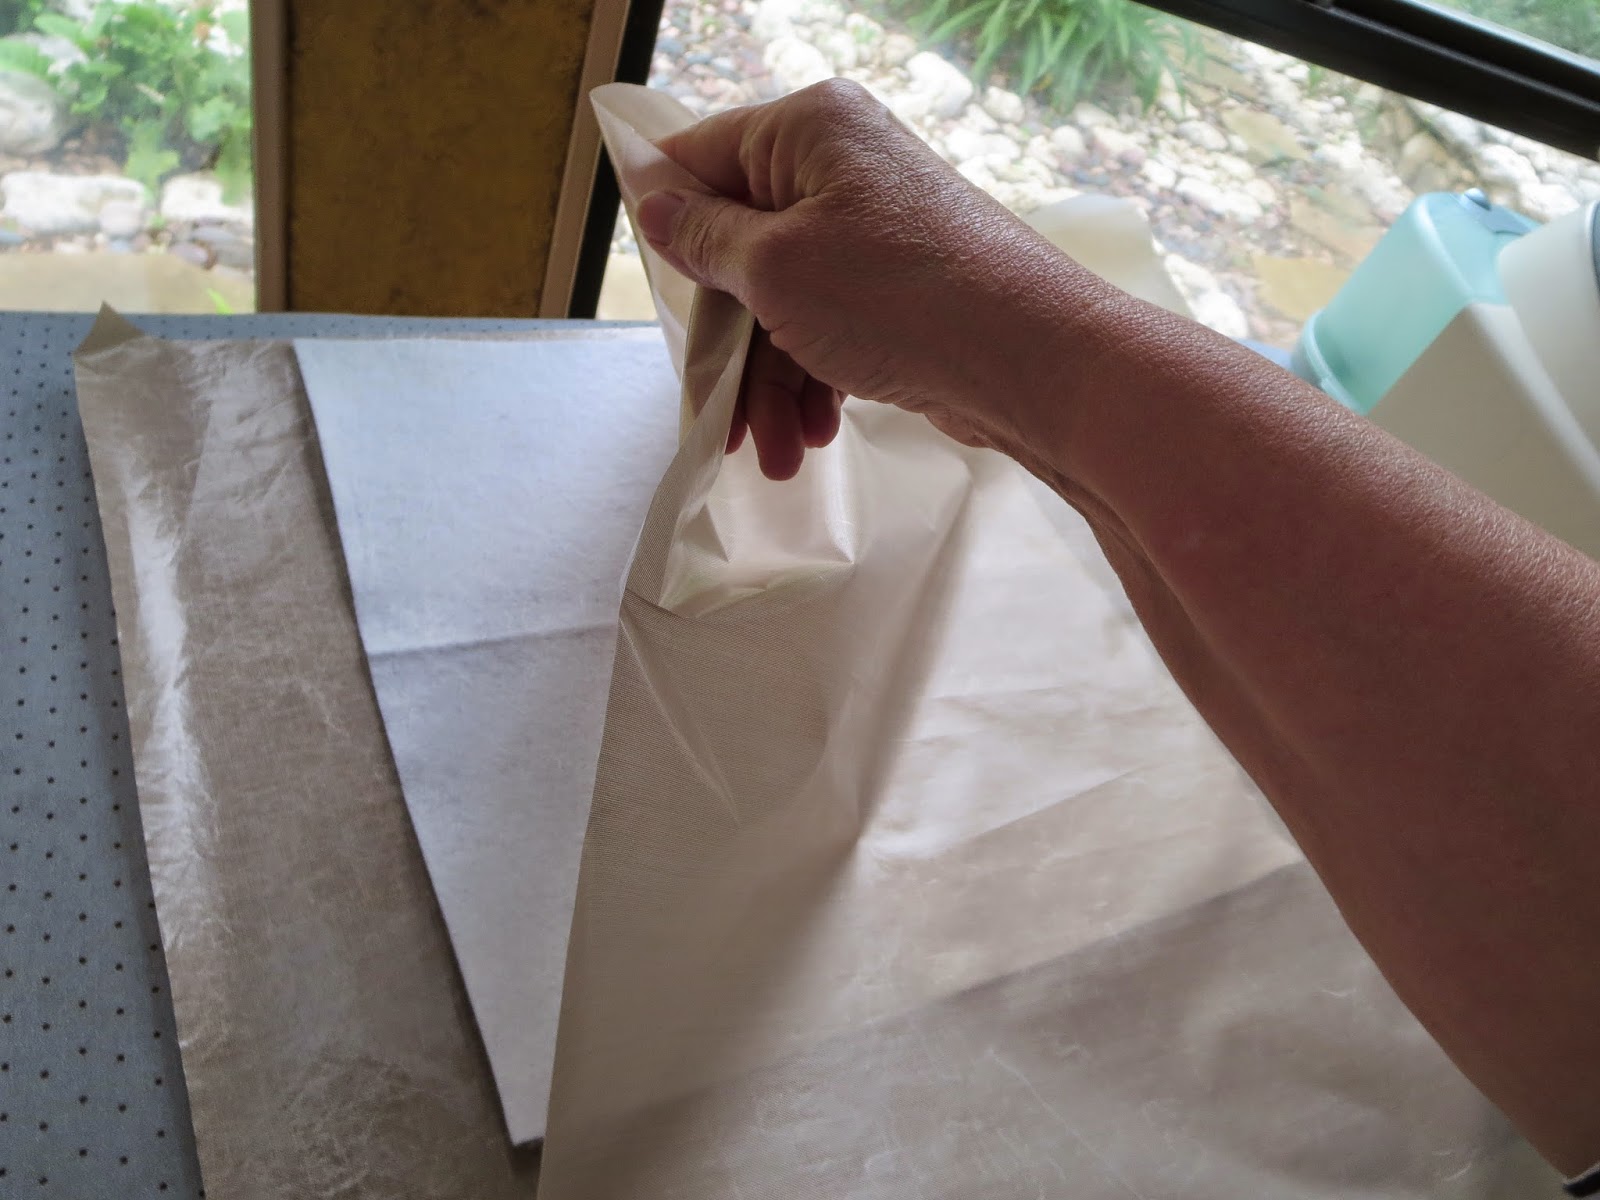
Note: This is one of the two places I use rechargeable electric scissors:
Cutting Mistyfuse off the roll is a breeze with these, especially when working with organza.
Organza tends to have a great deal of static electricity.


Once the felt piece was cool, I cut a second piece of Mistyfuse and overlaid it on the surface of the felt but did not fuse it. With certain items I have discovered that a second piece fused to the first will often assist in containing things that are errant and loose, such as these wonky clothing labels. The labels do NOT want to play nice, so the second layer of the Mistyfuse makes it mind better!
I took the organza and cut the Ricky Tims shape from my Accuquilt Go! cutter, the layered it onto the remaining uncut piece of organza. This double layer of fused organza was then cut with the dress shape on the Big Shot cutter. Magical!


Note: I prefer laying the organza over the cutter so that the fusible side is facing up but it isn't
necessary. The main thing to remember if you are cutting more than one fused layer is to "stack" your pieces so the fusible sides are always separated. They can get stuck together a bit and it will cause you a bit more work!


This die-cut piece is then overlaid onto the remaining piece of organza and fused.

The double-layered piece is then positioned over the dress die
and run through the Sizzix cutter.

Yay!
I carefully placed the labels in some sort of closely organized mosaic over the surface of the felt (remember I have a loose layer of Mistyfuse there). Once I have it the way I want it I fused it to the surface.


Then I placed the dress in position and fused it. One of the best parts about the organza is the layered transparency. I love being able to see the clothing labels through the dress. So much fun!

The original piece was very closely quilted in rows using my dual-feed on the Bernina 750QE.

The book is available on amazon:
and here's the interweave website link:
Please be sure to stop by all the other blogs on this hop and leave a comment to be eligible for the giveaway!
May 4: Sue Bleiweiss: http://www.suebleiweiss.com/blog/
May 4: Jamie Fingal :http://www.jamiefingaldesigns.com/
May 5: Leslie Tucker Jenison: http://leslietuckerjenison.blogspot.com/
May 6: Terri Stegmiller : http://stegart.blogspot.com/
May 7: Deborah Boschert : http://deborahsjournal.blogspot.com/
May 8: Desiree Habicht : http://myclothesline.blogspot.com/
May 9: Kathy Sperino : http://finishinglinesbyksperino.blogspot.com/
May 10: Barb Forrister : http://www.barbforrister.com/blog/
May 11 Kathy York : http://www.aquamoonartquilts.blogspot.com/
May 12: Lyric Kinard : http://lyrickinard.com/lyric-kinard-blog/
Enjoyed reading this...twice..so I could take in all the steps. I was just taking a little break from cleaning my iron after a momentary brain freeze caused me to place my iron right down on a piece of fused fabric without first covering it with a goddess sheet. Give me strength! LOL
ReplyDeleteOy Vey! We have all done it at least once!
Deletewonderful tutorial , thanks for all the good details; Misty fuse is now on my must try list
ReplyDeleteYou will love it! It is the only fusible that does not change the "hand" of your fabric. I can say that is true even with sheers!
Deletewonderful description of your technique and the uses of MistyFuse - thank you!
ReplyDeleteYou are so welcome! Thanks for stopping by!
DeleteThank you for sharing how you did this piece for Sue's book. Great! Loved your description!. /I got her book right away from Amazon and wrote a review (under my Amazon pseudonym)./ I am just learning how to use Mistyfuse. Thanks again for posting your process!
ReplyDeleteLove to use misty fuse...enjoyed your process. I need to do more art quilting.
ReplyDeleteThank you, I just learned something I had not thought of, double layer of misty fuse.
ReplyDeleteI've actually collected quite a pile of clothing labels, I don't save all of them, just the ones I particularly like. I don't know why - or up until right before I read your blog, I didn't know why! Thank you for your affirmation! Now I see one additional reason for wanting this book.
ReplyDeleteYay! Please let me see your finished "label" piece!
DeleteI LOVE mistyfuse!
ReplyDeleteMe, too!
Deleteawesome
ReplyDeleteSo you used 3 different die cutters?
ReplyDeleteVictoria, I used 2 different systems: the Go! Cutter has the Ricky Tim's die (which I could have used in the Sizzix with an extra insert) and I used the Sizzix Big Shot for the dress shape.
DeleteInteresting technique using the organza.
ReplyDeleteamazing technique. This looks like a very fun book with tons of possibilities!
ReplyDeleteLooking for new inspiration
ReplyDeletefun book, good ideas
ReplyDeleteThanks for sharing your process! And thanks for the chance to win this wonderful prize package!
ReplyDeleteI love the way your mind works and love how this piece was layered and the use of the various cutting devices. I am seriously jealous.
ReplyDeleteThank you for sharing your process - always fascinating. I have been intimidated by sheers so need to dig some out and try the Misty Fuse approach.
ReplyDeleteTawney, I completely understand as I felt the same way for so long. The Mistyfuse sort of "tames" the organza without making it stiff and nasty. Try it!
DeleteThanks for sharing the details of your process!
ReplyDeleteWhat a gorgeous project! I will have to try mistyfuse...would love to try her techniques in her book, too!
ReplyDeleteI've read so much about Misty Fuse and how much you all like it. Gonna go get me some. I love this tutorial.
ReplyDeleteI can't say enough good things about it. Get a 10 yard packet to begin, but know that the rolls are the best way to use it on a regular basis!
DeleteYOU ARE ALL SEW CREATIVE!!
ReplyDeleteLove your creative use of the Labels. Step by step photos are very instructive. Thanks.
ReplyDeleteGreat tutorial! Thanks for the giveaway.
ReplyDeleteDiane
I love your project.
ReplyDeleteThanks for the tutorial! I'm now following you on Bloglovin'.
ReplyDeleteThank you for showing the process in creating labels. Very clever!
ReplyDeleteEnjoyed seeing your process! Who would have thought to use clothing labels...wonderful idea!
ReplyDeleteThanks for showing your process! I love misty fuse!! I met Iris at R2C and bought a 100 yd roll. Such a great product. Definitely going to try it on some more delicate fabrics now. Thanks!
ReplyDeleteAmazing project!
ReplyDeletenikilsend(at)outlook(dot)com
Book looks great! And I'd love to try Misty Fuse, it's a new product for me.
ReplyDeleteThanks for the tutorial on your technique. Misty Fuse is a great product.
ReplyDeleteI now know I have to get 2 Goddess sheets after reading this.....the pressing sheet I tried to use does not play well with Misty! Thanks for the info Leslie...I totally love what you did with LABELS !
ReplyDeleteI love your piece ... but confess I was a little taken aback by the sheer number of product placements in your blog post. You must have quite the collection of tools and gadgets in your studio.
ReplyDeleteA very interesting process, thanks for taking the time to share it all.
ReplyDeleteYou have such great toys. Love your fun labels piece. Thank you for sharing details about the process you followed to create your piece and also for the chance to win.
ReplyDeleteYour project is great! It was interesting to follow your process in making "Labels". Thanks for the chance to win a copy of Sue's book.
ReplyDeleteWhat an interesting post - I am going to try this. Thank you for sharing!
ReplyDeleteOne word...Awesome! Love your project!
ReplyDeleteI'd love a chance to win. LeeAnna at not afraid of color my addy is leeannaquilts at gmail dot com
ReplyDeleteLove your use of labels and the fabric for the dress. Thanks for the details! I would love to try.
ReplyDeleteWhat a unique project! Thanks for the great tutorial! And thanks for the chance to win this great prize!
ReplyDeleteThanks for the details on how you made this delightful piece.
ReplyDeleteThank you for thoroughly explaining how you use Misty Fuse. So helpful! -- soparkaveataoldotcom
ReplyDeleteThank you for the detailed step-by-step guide to your piece - really interesting.
ReplyDeleteWow, those bright colors are gorgeous! Thanks and God bless! ILuvTheEucharist @ aol.com
ReplyDeleteI always learn something from all the artists! would love to win the book and goodies to go with it!
ReplyDeleteThe double layering of the Ricky Tims' stencil and the dress is great! Thanks for sharing your project. This book would be inspiring for me!
ReplyDeletewow, like your project and tutorial, thank you...marta...martamanole@yahoo.com
ReplyDeleteWhat a great project!
ReplyDeleteThank you for sharing how you use Misty Fuse in your project! I would love to win!
ReplyDeleteThis comment has been removed by the author.
ReplyDeleteWowie!!! you are soooo creative!!! Love your project! & thanks for showing us how to do! Definitely would loooove to win!!
ReplyDelete"Labels" is amazing! Thanks for the chance to win!
ReplyDeleteYour project is fabulous!
ReplyDeleteOh I love your project! I am so glad you showed me how to fuse organza!!!
ReplyDeleteWhat a beautiful book, thanks for the chance
ReplyDeleteMarsha vamoody(one)(@)verizon(dot)net
So cool!
ReplyDeleteHow cool is that! Thank you for sharing.
ReplyDeleteThe book looks wonderful and thanks for the double layer of misty fuse tip.
ReplyDeleteSo very clever and inspiring! Thanks for the chance to win!
ReplyDeleteThanks for the chance to win! jvermunt(at)shaw(dot)ca
ReplyDeleteGREAT Review and fabulous Tute! So nice to see such wonderful step by step photos... Off to find that book!
ReplyDeleteI see Misty Fuse on my near future "gotta try this" list!! Thank you for the clear information.
ReplyDeleteInteresting to see the how to behind this, thanks!
ReplyDeleteIve often thought there were some really striking lables on clothing lol
Colorful Fabric Collage! Come play inside Sue Bleiweiss' new book, Describe the service you looking for. Service Basket UAE will match your request with the service partners that can best meet your request. Service Basket Movers is professional moving company. We provide several services like movers and packers, house movers and packers dubai.
ReplyDelete