Wednesday, November 1, 2017

Quilt Market 2017: Introducing "Urban Garden"

I am very excited about my second line of fabrics with RJR called
"Urban Garden"
This is a very personal line for me.  I am highly influenced
by my garden(s), both current and those in my past.


My friend and sister guild-member Eileen created 3-dimensional "succulent plants"
using Urban Garden.  These were used in a vertical garden in my booth.

In addition, I made these slightly larger succulent plants as door prizes in my Schoolhouse presentation during Quilt Market.  Aren't they fun?

My friend Joanna made this gorgeous "Coalition" duffle bag,
pattern by Sew Sweetness.

The inside of this bag is lovely and the false bottom can be removed for a different shape.

I am standing in front of Garden Streamers Quilt made by
my friend Debra.  About to begin my "Schoolhouse" presentation.

Amy Barickman of Indygo Junction made these pretty pajamas from two prints of Urban Garden,
as well as a fun skirt and top.

Demi from RJR photographs some of the objects we brought to Schoolhouse.

I'm holding up one of these Crimson & Clover cases 
made by Joanna.  They are so fun inside and out!

On to the show floor and setting up my portion of the RJR booth.
I had fun mounting these half-sphere "bumps" stretched with each print of Urban Garden
and hanging a small "Girls" quilt made by my friend Jamie and all the cute little Beetles made by my friend Deborah!

Here is how the vertical garden looked after it was mounted to the wall and covered with moss.

The corner of my display was bursting with beautiful quilts on the rack and one on the wall.

A small storage vanity gave me a perch for bags, garments, and my business cards.

Urban Garden will be hitting shops in spring 2018.  Be looking for it, and please ask about it at your favorite local quilt shop!  Let's all support our local shops so we will always have them around!

Friday, October 27, 2017

Tutorial: Three-Dimensional Leaves Using Urban Garden Fabric Prints!


I'm so excited to share my second line of cotton fabrics, called "Urban Garden", a 24-print array from RJR Fabrics.  This line is extremely personal to me as I have always been a gardener.  I have so many memories attached to activities in the garden of my childhood and I consider my current garden a sanctuary and place of inspiration.
First, let me show you the various prints:


For my short "Schoolhouse" presentation at the 2017 Fall Quilt Market I opted to create a project that uses the charm pack (a stack of 5" squares with all the prints) for a project other than a quilt.  I love to create dimensional leaves and I hope you will enjoy trying this!  Once you become familiar with the basic technique, you can vary the shapes any way you want.  

For each leave you will need two 5" squares, plus one 5" piece of batting.  This is a great project for using up all those extra scraps of batting left over from a quilt project!

First, place the two prints, right sides facing together, and the batting on top.


If you wish, you can use a chalk pencil or other marker to denote the stitch line.  You can see I drew
a dotted line next to my stitch line so it is easier to see in the photo above.  I opted to go with a simple leaf shape that utilizes the majority of the area in the square.  I left a 2-inch opening at one end in order to turn the piece right-sides out.  When stitching it is very important to back stitch the opening on both sides as well as the point of the leaf.


Trim the excess fabric and batting to 1/8 inch from seam.  Also:  cross cut the leaf point to minimize bulk.

To turn, slide a finger in between the two pieces of fabric.  Gently begin turning the construction right sides out.  I use the tips of my scissors to gently push the tip of the leave out as much as possible.

Here is my stack of fabric with batting (low loft is best).

It is easier to visualize the seam line from the "batting side".


Here, I am using the scissor edge to gently form the seam edges of the leaf.


To add the leaf veins, I use monopoly thread in my bobbin, but this is optional.
I opted to change the thread colors for the veining.  You can use the same color top thread and bobbin, if desired.  Pull the bobbin thread up to the top during this process.  Lower the feed dogs if 
you plan to free-motion stitch the leaf veins.  Or, 
as an alternative, you may straight stitch.  If you have dual-feed it is helpful but not necessary.


If you aren't comfortable handing the leaf in this manner, the straight stitch will work just fine!
No worries!


Here is one option for the leaf veining.


After sewing the edges of the felt base I attached a loop onto the back.

Working from the lowest part of the base I stitched each leaf into place on the sewing machine.

At the top I created a "bow" using a tube of sewn print.  I think any number of things
could be pinned to the top of the felt to make it "seasonal" (fall berries, a ribbon, a stuffed toy,
a hedgehog, a bunny.....you get the idea).  


Have fun with this idea and please let me know when you make something using Urban Garden!
I love to hear from readers so drop me a line, but mostly, thanks for stopping by.
xo leslie


Tuesday, August 29, 2017

Donating To Hurricane Harvey Relief

I am cut/pasting an article from San Antonio Current magazine which had a good list of the organizations (with links) who are on the ground and providing all kinds of assistance to evacuees of this storm.  Please read through them and consider making a monetary donation.  We quilters, myself included, always want to send quilts to victims of a disaster.  There will be a proper time for that, but in the meantime the needs are much more basic to survival of people and animals.  People need food, diapers, pet food, and more.  It is going to be a massive and monumental rescue, recovery, repair effort.  Please donate money if you possibly can.  These organizations know how to make a dollar go a lot further than you or I can due to their strategic relationships with other organizations and businesses.  The money allows them to prioritize what they need and get the services and goods required.  Thank you for reading this.  xoxo Leslie

PS-At the bottom of the list are drop-off points in the city of San Antonio for items.  Also:  I have been in contact with the people at the Animal Defense League (listed below) and they are not only looking for fosters but pet food and other supplies.  If you are local and you can help with any of those things it would be much-appreciated.  Thanks.

With hurricane and flood damage devastating Houston, Corpus Christi, Port Aransas and other cities along the gulf coast, several Texans are wondering how they can help communities that have been effected the most. Here's a list of organizations asking for volunteers and donations:

  • The American Red Cross, which provides emergency assistance and disaster relief, is seeking donations to help victims of Hurricane Harvey. The organization is urging people to make a minimum donation of $10 by calling 1-800-RED CROSS or texting HARVEY to 90999. 
  • The Salvation Army will remain in communities that have been impacted by Hurricane Harvey and is in need of donations to provide long-term disaster recovery efforts and ongoing assistance to those in need. 
  • Food, monetary donations and volunteers are need at the San Antonio Food Bank, which is in response mode to support local and statewide needs. Most wanted items are nonperishable food, water, baby food, diapers, flashlights and batteries, new or packaged clothing , hygiene products and cleaning supplies. Donations can be dropped off from 8 a.m to 5 p.m. at the Food Bank warehouse, 5200 Enrique M. Barrera Pkwy. Donations and volunteer registration can be made online
  • The Texas Diaper Bank is in need of monetary and diaper donations to provide kits to the families that are being displaced. Donations can be made at texasdiaperbank.networkforgood.com or by calling (210) 731-8118.
  • The Animal Defense League of Texas and San Antonio Pets Alive ask for donations and volunteers to foster a dog or cat that has been displaced by the hurricane. Steps to donate and register to volunteer can be found on the organizations' websites. The San Antonio Humane Society is also asking for donations, which can be made at sahumane.org
    • The City of San Antonio has coordinated donation drop-off locations for evacuees at district offices. Needed items are nonperishable food, water, baby food, diapers, hygiene items and new clothes. Donations can be taken too D1 Field Office, 1310 Vance Jackson; D2 Field Office, 2805 E. Commerce; D3 Field Office, 3319 Sidney Brooks D4 Field Office, 5102 Pearsall Road, D6 Field Office, 8373 Culebra Road; D7 Field Office, 4414 Centerview Suite, 160; D7 Field Office, 4414 Centerview, Suite 160; D8 Field Office, 9830 Colonnade, Suite 165; D9 Field Office, 1635 NE Loop 410; and D10 Field Office, 1635 NE Loop 410. 
    • I am adding a link to Pokey Bolton's (a former Houston resident) blog as she has several other organizations you need to know about.  Thanks SO MUCH!  I am going to add to this very soon as I have a close friend with property (fortunately, a vacation home) in Port Aransas TX which is right next to Rockport.  You may recall this is where the hurricane made landfall. We are all looking at Houston, as we should, but we have to remember that everyone in these coastal areas are in just as much need.  She is going to Port A tomorrow, the first chance her family has of getting into the area.  I have asked her to let me know what she can identify.  Thanks again for reading this.

Friday, August 4, 2017

What Shade Are You? Take A Look At A Quilt Made With Solids From RJR!


Aerial Geometry 2:  Home & Place (detail)
Since I have been studying with Nancy Crow these past few years I have rekindled my love of solids.  In addition to dyeing my own solids, which I love to do, I am using a lot of commercial solids.  One can imagine that "solids are solids"....it probably doesn't make much difference who you buy them from, right?  Wrong.
Did you know that many companies source their "gray goods" from multiple places?  That some companies outsource the dyeing to just as many sources?  Guess what happens to the quality control??  You got it.
Let's talk for a moment about RJR.  As a surface design artist it goes without saying that I spend a lot of time working with cloth;  quality is important to me.  Last summer when I was making objects with Urban Artifacts I had selected a group of solids to accompany the print line.  I noticed that the quality of the fabric was quite good.  This was feedback I received from every one of the makers who worked with the fabric.  I started to wonder about it and I inquired inside the company.  Here is what I learned:  the owners of RJR have had a long-standing relationship with the same Japanese company for the source of all their cloth as well as their printing and dyeing.  There is a very high quality of cotton broadcloth used and it is consistent.  This matters to me.

A few months ago I was approached about making a quilt for the "What Shade Are You?" project and I happily agreed because I really love the Cotton Supreme solids.  My style of working tends to be improvisational in nature so there is no pattern to be acquired with this project, but I'll share with you what I used to create my quilt.
Here is the list of all the fabrics:
283-On The Rocks
433-Silver Lining
380-Silver Screen
319-Overcast
321-Greyhound
395-Warm Gray
125-Silver
341-Stormy Night
282-Gale Force
92-Goldenrod
368-Goldilocks
357-Sunset Ruby
222-Redwork

3067-002 Box Springs in Wine
3067-003 Box Springs in Charcoal

I'm going to "walk" you through how I constructed this quilt and what I was thinking about when I was designing it.

I love to use a rotary cutter to "draw" lines and shapes into my fabric.  I think of the rotary cutter as my pen or paintbrush and the cloth as my paper or canvas.  When I piece elements together those seam lines become my gestural "marks".  For me, it has been a new and exciting way of thinking about the work. 
In this construction, another piece in an ongoing series called "Aerial Geometry", I am thinking about my experiences of flying over the Great Plains in a small aircraft and looking at the geometric layout of fields, crop rows, and farms dotted across the landscape.  Quite a bit of my abstracted work is about the meaning of home and place.  I'm interested in the juxtaposition of natural and man-made elements.  While it might not reach out and "smack you over the head" my work frequently includes shapes and symbols that represent these ideas in many of my quilts. 
Also in this quilt I have included a basic house-shape, a nest shape, and some graphic Alliums to represent my garden.
First, I free-cut numerous strips of all the neutral colors in my palette.  These were sewn together and small segments of Goldenrod, Goldilocks, Sunset Ruby, and Redwork were added randomly throughout.  I created sections of gray neutrals and "beige" neutrals separately. 


On my design wall I marked a general shape to represent the intended size of my construction.  I find this to be a helpful guide while working.

My desire was to alternate the gray and beige areas, which were cut from the long pieced sections
in alternating sizes and widths.  I wanted to vary the direction of the pieced shapes.


Here is how I "built" the construction:  first the pieces, then the rows,
then I joined the rows.  When piecing these somewhat amorphous shapes I overlaid the edges and
cut through them so the pieces would come together as a flat construction.
I didn't worry about that whilst piecing the strips because I steam-ironed the strips really well.
It does become important when laying the larger shapes together.

Here are all the large shapes before the rows are joined.

After the background was pieced together I created "stems" for my Allium elements
by cutting sections of Gale Force and Rework fabric colors, folding and sewing a quarter-inch
seam, then rolling the seam under and pinning the stems to the surface, then stitching in place.
Four stems were appliquéd prior to the quilting, and one was added afterward to create some visual depth.

Next, I stitched together a group of raw-edge strips of solids and prints to create
a "nest", which was stitched onto the surface of the construction.
I wanted all these elements on the surface prior to being quilted as I planned to add more elements
after the quilting.

Here is a closeup of the "nest" components.

Here is a photo of one of my dry giant Allium blossoms, still standing in my garden.  I enjoy their
metamorphosis and I like how they look after the blossoms have dried out.  They offer a
lovely visual texture in my garden so I leave them in place as long as possible.

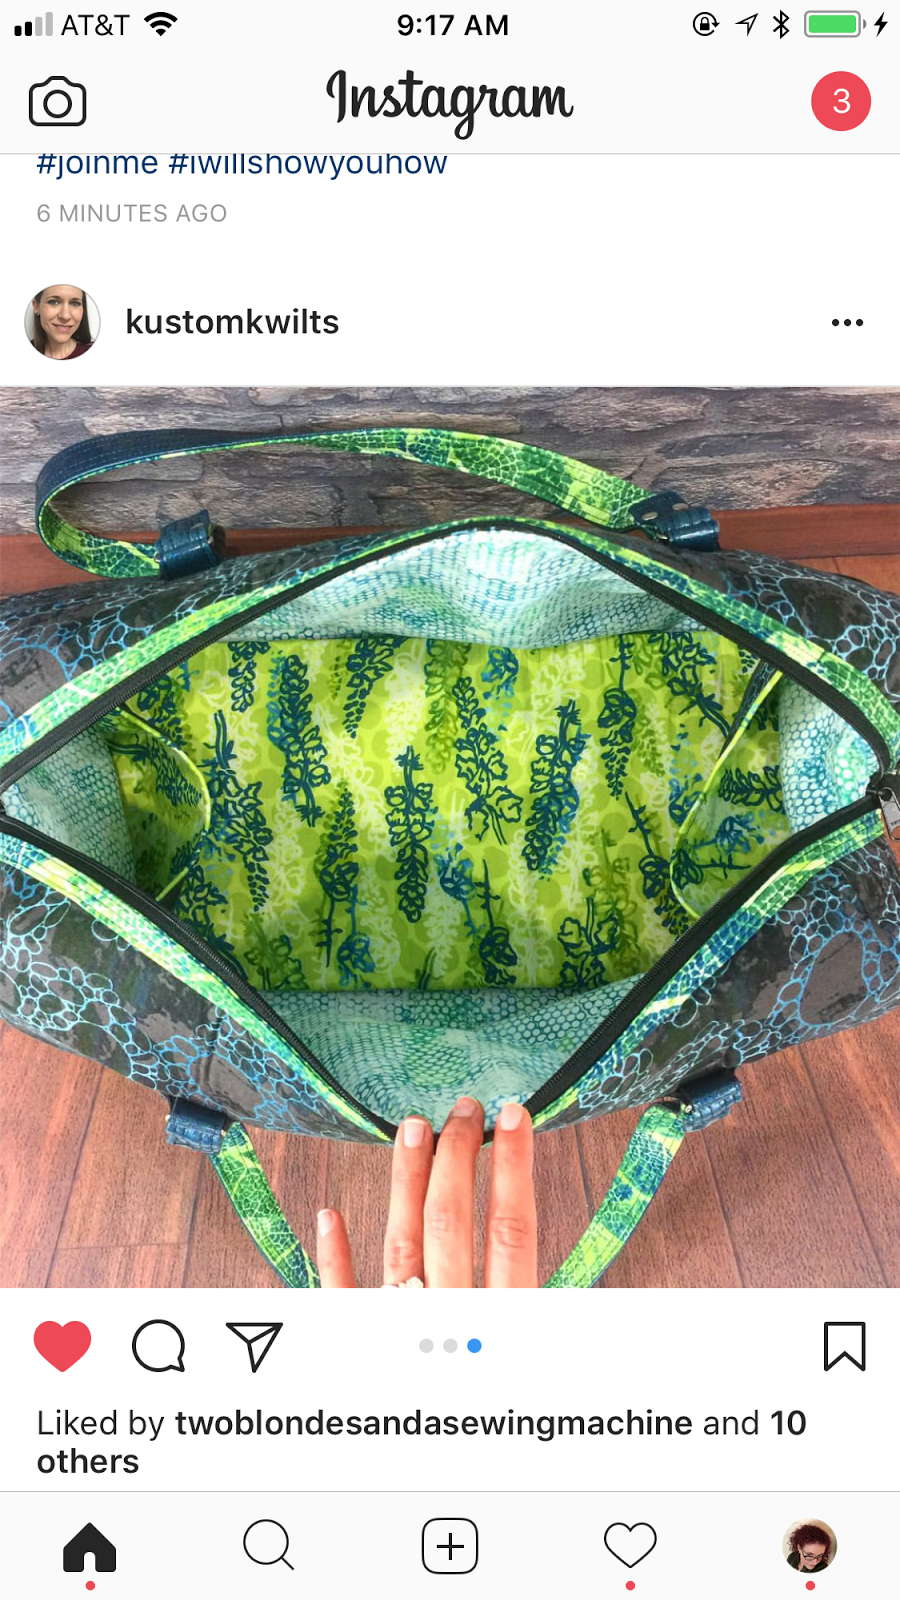
My quilt was longarm-quilted by the talented Joanna Marsh from
Kustom Kwilts.  She did this beautiful matchstick quilting of the background.
I like to use a double batting of Quilter's Dream Orient and the top layer is Quilter's Dream wool.
This seems to be a perfect combo:  lightweight, breathable, and perfect for quilts that will need to be shipped and folded as the wool prevents creasing!

I free-motion embroidered the first layer of blossom with my sewing machine feed-dogs down.
Then, I hand-embroidered more stem components of the blossom and the buds were added with
French knots.  This is one of the few places where I really need to use a thimble because
that is a lot of layers of fabric and thread to push a needle through!


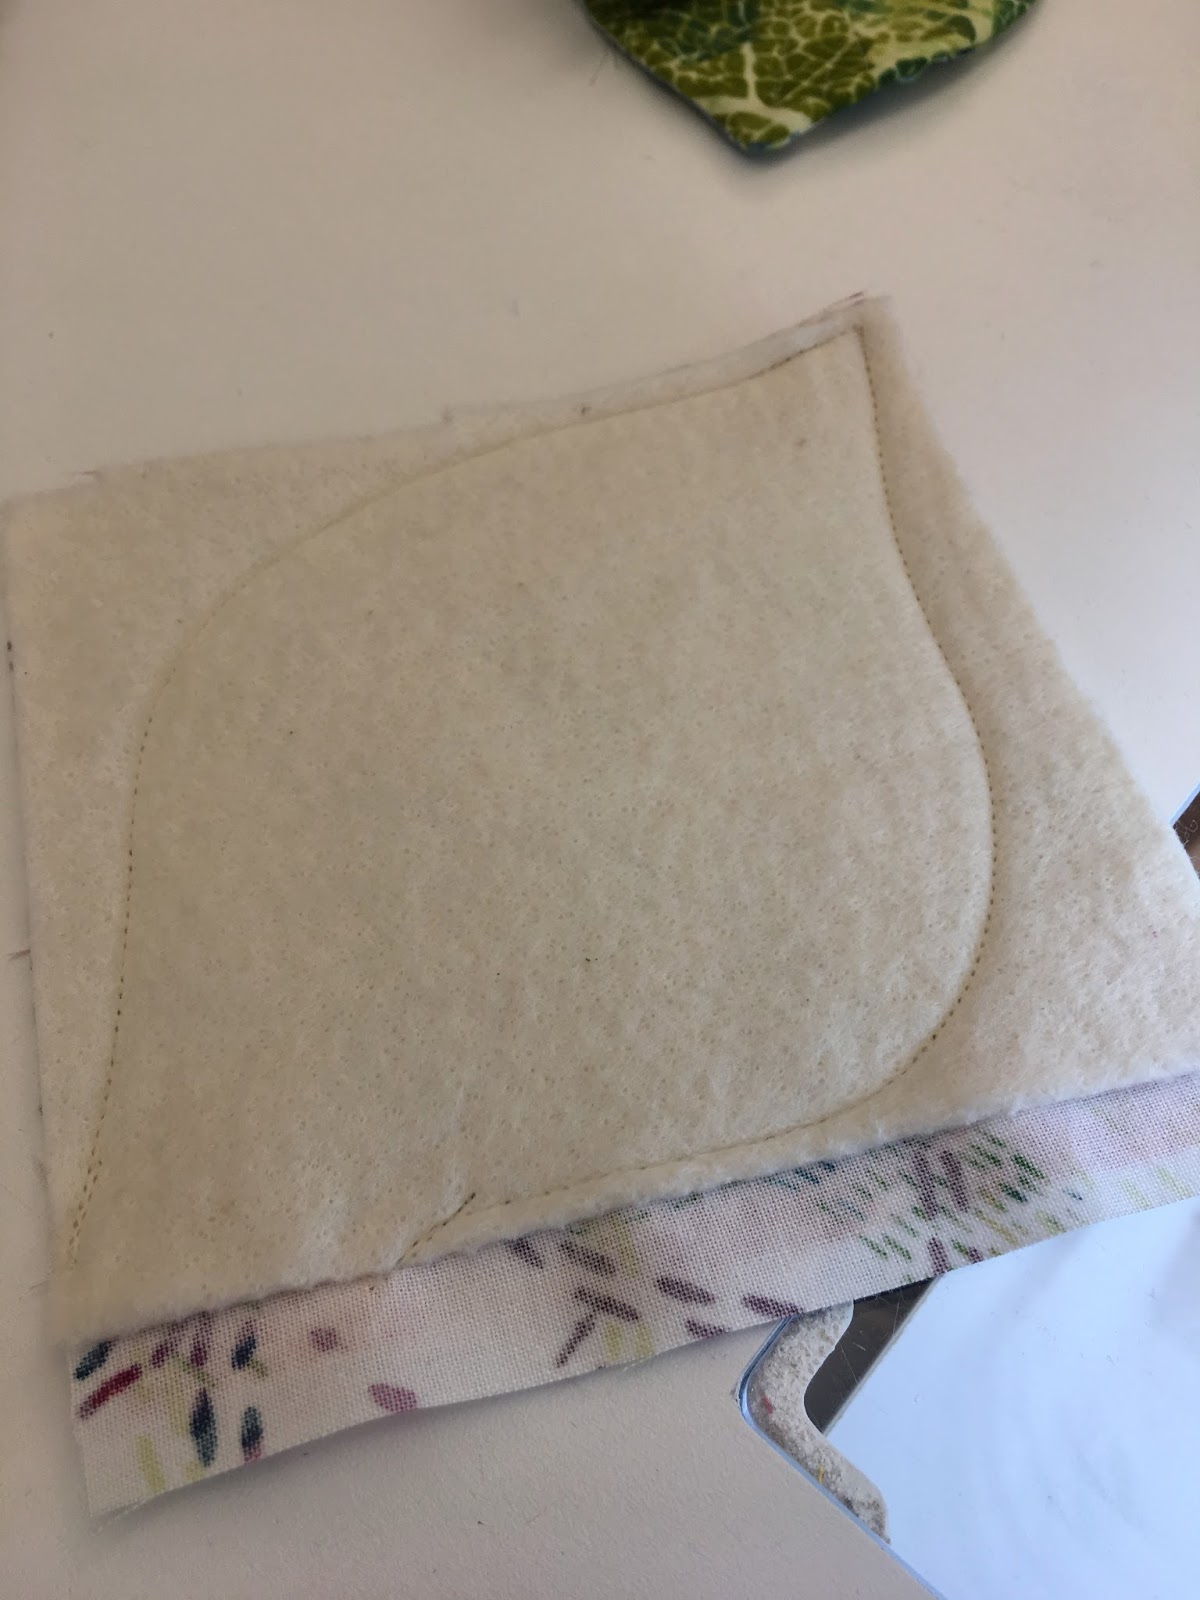
The roof and base of my "house" were created with Urban Artifacts by pillow-casing some batting between two layers, stitching and quilting the pieces, then appliquéing them to the quilted surface.


Next, I squared up the edged and stitched a facing onto the quilt, then turned it to the back and whip-stitched it in place.  This is a cotton canvas print from Rifle Paper company, which is
a division of Cotton & Steel (which is part of the RJR family, in case you didn't know!).

Here is what the turned corner looks like from the front.  I like the clean edge of a faced quilt,
particularly for one that is to be a wall piece.


I'm satisfied with the details of the construction.

And here is my finished quilt!
Dimensions are 40" by 40".

If you are coming to Quilt Market and/or Quilt Festival in fall, 2017, please look for my quilt as part of "Personal Iconography:   Graffiti On Cloth", a special exhibition presented by Dinner At Eight Artists.  Jamie Fingal, another designer for RJR, is the other half of the curating team with me. 
I hope you enjoyed seeing how my quilt was created.  I really encourage you to ask for Cotton Supreme Solids at your local quilt shop(s).  It is really a great product and I am a fan!