Come Sew-Along!
As part of the Small Sewn Gifts Sew-Along sponsored by Reanna Lily Designs I decided to make another of my Wonky Pincushions. This one is square-ish.
First, I cut 2 4-inch square pieces for the top and bottom of the cushion. I decided to make this one thicker so I cut an 18 inch length of the same fabric 3-inches wide. I also cut a 18-inch length of trim to
be used around the perimeter.
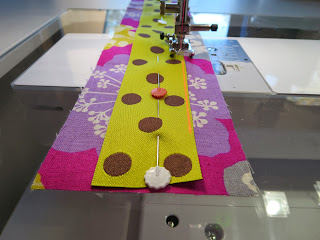
Using a bright pink thread I stitched the trim in place.
I turned the leading edge of the trim to create a finished "opening".
Placing one of the 4-inch squares, right sides together, on the side section I stitched them together,
stopping 1/4 inch from the edge and turning.
After stitching around the square I folded back the end, overlapping it with the other end, and stitched in place.
I repeated with the other square. You end up with an "inside-out" box.
Trim the corners for easier turnout.
Turn the pincushion right side out through the opening.
I wanted to stack a couple of buttons on the center of both sides.
I used beading thread as it is a bit stronger.
Again, you are working through the opening so you have to be careful not to stitch something you didn't intend to!
Once I had the buttons attached to the first side, I secured the buttons on the second side and
then stitched between the two sets. The idea is to have the center of the pincushion pulled inward,
so the thread is shorter than the depth of the cushion.
I rolled a piece of paper into a cone and began spooning sand into the opening.
Why sand? Well, I like a pincushion that can defend itself. I want it to stay put.
So, a little "heft" is what I am looking for, and it is good for the pins, while we are at it.
You may choose something else if sand isn't your thing.
I filled it as much as I could.
I chose a thread color as close to the tone of the trim as possible.
It isn't perfect (whatever that means) but it is close enough!
I like that the sides "bulge" a bit, which makes the seam around the top pull inward.
If you are needing a gift for a non-sewist, this could be a little mobile phone "rest"!
I think I would not fill it quite as much if I intended this as an official phone perch.
Once the pieces are cut the assembly is very quick. The dimensions could easily vary from the ones I used. Just be sure you have a bit of extra length on the side piece. Any excess can be trimmed before you fold the final piece over. Have fun!


