

Welcome to Hopscotch: a playful tone-on-tone blender line! This collection of 83 fabrics features hand-drawn imagery chosen from Jamie Fingal's sketchbooks. Images such as dots, various geometrics, flowers, and whimsical loop-de-loops. It's all here! The large collection is a veritable rainbow of colors and will be the perfect blender to reach for in any of your projects.
The line is launching at Spring Quilt Market in St. Louis, MO in May, and will be arriving into your favorite quilt shops in August of 2017.
Jamie, as many of you know, is a close friend and the other half of Dinner At Eight Artists. We enjoy collaborating on a variety of things and when she asked if I was interested in creating a small quilt using her new line I was very excited to work with it. I selected these:


Please be sure to stop by all these artists' blogs to see what they created using Hopscotch. Have fun, and thanks so much for stopping by!
hop, skip, jump blog hop
4-24 Jamie Fingal https://jamiefingaldesigns.blo
4-25 Cindy Cooksey https://cookseyville.blogspot.
4-26 Sue Bleiweiss https://suebleiweiss.blog/
4-27 Lyric Kinard https://lyrickinard.blogspot.c
4-28 Susan Brubaker Knapp https://wwwbluemoonriver.blogs
5-1 You Are Here!! https://leslietuckerjenison.bl
5-2 Deborah Boschert https://deborahsjournal.blogsp
5-3 Libby Williamson https://libbywilliamsondesigns
Jamie, as many of you know, is a close friend and the other half of Dinner At Eight Artists. We enjoy collaborating on a variety of things and when she asked if I was interested in creating a small quilt using her new line I was very excited to work with it. I selected these:

and oops I guess I didn't get the bright orange in this shot but you will see it...
Lately, I have been doing mostly improvisational work that is "free-cut" with a rotary cutter (meaning no rulers) and I thought it might be interesting to see if I could generate an abstracted botanical piece.
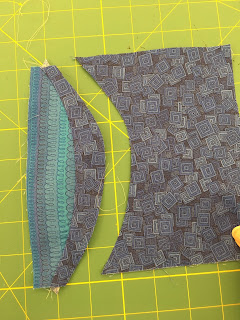
Here's the basic idea: First, I cut several pieces of fabric into large rectangles. Next, using my rotary cutter and beginning at the TOP of the cut I made a curved arc into the cloth. Now, people who use rotary cutters tend to cringe at the idea of pulling to rotary blade toward themselves but the truth is that, when free-cutting, one tends to have more control over the cut. It feels more like drawing with a pencil or painting with a brush. That's how I like to think of it. I'm being a nerd to admit this but it completely thrills me that I have a gestural "mark" as this cut seam. Is that weird? Probably.

The first cut

Next, I overlay the cut fabric onto the piece I intend to sew it onto. The fabrics must overlap at the seam.

Once cut, I turn the fabrics, top side is the concave edge, and stitch.


The seam is pressed to the convex arc. It just "feels right"

Taking the piece back to the cutting mat I repeat the process.
This is basically the idea: building shapes, taking care to always sew with a 1/4" seam allowance.

Here is an almost-finished "tulip".

Eh, why leave it alone?! I want to add some more to it, plus I need to join it
to another large section of the construction.


Here is the back of part of the tulip.

I love looking at the back side of an improv (well, really, ANY sort of construction!) piece
as sometimes it seems to tell more of the story about its making.

This just bugs me. First, I'm not fond of the tulip on the right because of the two leaves.
I ask myself what I was thinking! It looks trite. It is going to go under the knife again....

I wanted a couple of abstract "buds".

So I lopped off one of my leaves on the red tulip and moved it to the right edge.

Here are two large pieces, overlaid before they are cut for a new seam.

And here it is after the seam is sewn.

I opted to quilt the surface with light gray, black, white, and two fluorescent thread colors
in order to "ghost" a couple more buds into the piece.

Here is the finished piece. I opted to do a facing on the quilt.
The finished size is 18 inches square.
Please be sure to stop by all these artists' blogs to see what they created using Hopscotch. Have fun, and thanks so much for stopping by!
hop, skip, jump blog hop
4-24 Jamie Fingal https://jamiefingaldesigns.blo
4-25 Cindy Cooksey https://cookseyville.blogspot.
4-26 Sue Bleiweiss https://suebleiweiss.blog/
4-27 Lyric Kinard https://lyrickinard.blogspot.c
4-28 Susan Brubaker Knapp https://wwwbluemoonriver.blogs
5-1 You Are Here!! https://leslietuckerjenison.bl
5-2 Deborah Boschert https://deborahsjournal.blogsp
5-3 Libby Williamson https://libbywilliamsondesigns