Friday, September 27, 2013

Primary, Secondary, Tertiary Circles!

Welcome to another fun blog hop using Pam Carriker's "Primary, Secondary, Tertiary" stencil!

And, of course, the first thing I want to do is paint my color wheel with it.  Who could resist?  Well, I am resisting, at least for the moment.  Because the other thing this stencil reminds me of may be less obvious, but it strikes me as being similar to the shape of an instrument on an aircraft panel, or a compass of sorts.  That is how I intend to use it.
I have been thinking about doing a page related to a 25th anniversary road trip I took in 2012 with my friend, Karen.  We drove up the Pacific Coast Highway for the first time together in 1987 from Los Angeles to San Francisco, again a few years ago, and in 2012 we began in San Jose and headed north as far as Mendocino before heading south to Los Angeles.  It was while we were in Mendocino that we discovered the Montgomery Grove of redwoods.  This was my first encounter with the giant redwoods, but it has been a lifelong dream.  I wrote about this before, but for the record:  as a kid growing up in land-locked Kansas I wanted more than anything to see whales and redwood trees.  It took me longer than it should have to accomplish it, but it was an exquisite moment when I finally did.
Mendocino is such a beautiful place.
Here is an image of the coastline nearby.

Walking into the grove of the biggest giant redwoods was very humbling.

Can you see me?
(Lower left edge of the tree)


It was mind-boggling.

I created a quilt about it.
Confession:  I flipped the image because I made a technical error when I was making the "tree"
out of silk broadcloth.  Oops.  I'll just call it "artistic license".

I thought it would be fun to use the stencil to make a journal page.  I used two car rental maps I picked up on the trip.  I like to keep these for collage purposes.  Occasionally, I have to have an intervention with myself and cull some of these out.  Generally, I'm happy I bring them home because they are a nice "layer" in my work.
FIrst, I used Jessica Sporn's Flying Tulip stencil as background texture.

I tore a portion of the Mendocino map and layered it to the page with gel medium, 
Then used the Primary, Secondary, Tertiary stencil over a portion of it.

I did the same with a previously over-painted map on a watercolor postcard.

These were layered in place so that they perfectly overlap one another in terms of the stencil.

Taking another portion of my rental car map and positioning it so that the Mendocino National forest
is in the "bullseye" of the stencil, I glued the map in place and stenciled it with a transparent layer 
of green paint.

I moved the stencil over the page a bit more using opaque white paint and some 
more transparent green.

Then, I simply blotted a light layer of paint diagonally over the surface to 
mute things a bit.

This is the page prior to the postcard layer.


Positioning the card in place to match the background pattern of the stencil,
I glued the card in place.

(using Yes!) glue..

and a palette knife


Here is my sophisticated set of weights to secure the layers of paper nice and flat while drying.

Next, I used barrier letters and stencil letters to create "redwood" on the left side.

and "trip" with barrier letters set in place (this is prior to adding paint)

blotting the barrier letters with paint


I outlined the letters a bit in order to increase their visibility on the page

I added ransom numbers to the upper right corner.
Finished!

Don't miss out on all the fun!  Here are the other participating artists in the blog hop:


Thursday, September 26, 2013

Art Quilt Design from Photo to Threadwork: a dvd workshop review

Recently, I had the pleasure of watching Sarah Ann Smith's new workshop dvd by Interweave:

DVD or download available at the Interweave website.

It always interests me to learn a bit about how artists work.  I feel that workshop dvds are quite wonderful because, not only do you get to learn about a technique that you might want to explore, you get to see a bit about how the artist thinks.  Sarah uses a wide variety of materials and tools to accomplish her transition from a photograph to a textile composition.  

The workshop is divided into basically three segments:  preparation of materials, creating the composition elements and fusing them together, and using thread to add more dimension with the quilting. 

During the preparation portion of the  workshop you will be able to see the technique she uses to pre-fuse her fabrics with MistyFuse (my fusible of choice, too!), as well as how she is able to "tack" her various pieces in place until she has finished her composition, at which time she fuses things in place more firmly.  
In addition to the choices of fabric for each element in the design she introduces some additional tools: Derwent Inktense pencils, textile paints, and finally, thread during the free-motion quilting portion of the workshop.  The Inktense pencils and paint are used to add highlights or shadows to each of the elements, and Sarah does a nice job of explaining how she makes decisions about where these should go.  She discusses the need for establishing where the light source is, which dictates how the highlights and shadows should be placed, and she also (and as a painter I think this often gets missed) talks about the reflection of light from below a spherical object that "bounces up" to create a lighter area on the lower portion of the object.  We don't always think of it, but when it is overlooked (on any piece of art) it lessens the dimension of the object.
One place where I differ slightly with Sarah is the use of water-alone with Derwent Inktense pencils.  This is fine when working on paper, and probably acceptable on cloth, but it IS a fugitive media, meaning it can "run" or migrate when exposed to moisture.  I guess I'm paranoid and thinking of accidental exposure to water:  yikes!   I tend to prefer using Inktense pencils with textile medium.  One still gets the watercolor effect but, when dry, the media is permanent on the fabric.  

During the "composition" portion, she carefully explains how she finds and traces the various color values of each object as well as how to enlarge the photo composition.  She explains her method of layering the various cut pieces to create a nice overlap.  I enjoyed all the little "tidbits" about her titanium iron, how to deal with removing fusible on the iron plate, and also what she does to keep her teflon pressing sheet clean (I use the same process).   I cite that as an example because those are the small details that are often known to artists but difficult to say out loud because they are such a part of our method we take them for granted.  It is so helpful to know these things because they make working with fusible so much easier!

When Sarah moves to the sewing machine and the viewer begins to see how much impact the thread color choices have on the dimension of the objects it is truly inspiring.  Having a nice palette of threads is essential when adding depth and dimension to textiles.  To me, it is our most essential type of "paint" and what really defines us as what I refer to as being a 2.5 D artist.  Quilted work is not flat, not fully 
3D, but somewhere in between.  

Lastly, I was touched to listen to music performed by Sarah's son, Joshua, at the end of the dvd.  I haven't met Joshua personally, but I have known about his music through his mother.  I think you will enjoy it, too.

I believe that this workshop is valuable to just about anyone who is looking to work from photos to create quilts.  Frankly, there is great info here, even if translating a photo into a quilt isn't your objective.  It is worth a watch, and I encourage you to add it to your library.

One way you may be able to do that is to leave a comment here.  I will use my iPhone "randomizer" to draw a name from anyone who comments.  Cutoff for the drawing is midnight, September 28th.  I will contact the winner to let you know.  If you are within the US you will be given a DVD, and if you are international you will be given instructions for downloading your copy from the Interweave website.

Thanks for stopping by!  Please take another minute to stop by Sarah's website:  she has a lot of great resources and you can look at all her lovely work!

Other stops on the blog hop route:
Sept 21 - Deborah Boschert    http://deborahsjournal.blogspot.com/
Sept 24 -  Vicki Welsh    http://vickiwelsh.typepad.com/
Sept 26 - Leslie Jenison  http://leslietuckerjenison.blogspot.com/
Sept 28 - Terry Grant   http://andsewitgoes.blogspot.com/
Oct 1 - Gloria Hansen    http://www.gloriahansen.com/weblog/
Oct 3 - Diane Perin Hock    http://goingtopieces.blogspot.com/

Oct 5 - Sarah Ann Smith  http://www.sarahannsmith.com/weblog/ 


Monday, September 23, 2013

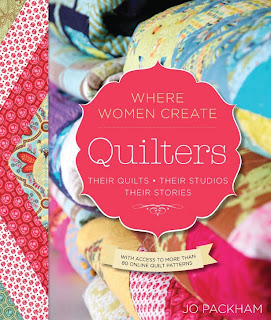
"Where Women Create: Quilters"


If you are coming to Quilt Market in Houston,
please join me, along with many of my fellow featured artists,
for a book signing at the Brewer booth on Saturday, October 26th, at 12:30.

I'm so honored to be a part of this beautiful book!

Friday, September 20, 2013

Quilt Match Manhattan 2013 trailer


I almost spit tea on my computer screen when I watched this.  What a riot it is going to be!
I hope you are coming to this evening event in NYC.  If not, consider buying a "home ticket".
It is gonna get crazy!


Wednesday, September 18, 2013

The House Protects The Dreamer....

Greetings.  This month the contributing artists of the Sketchbook Challenge decided to do a blog hop using the September theme, "Houses and Hideaways".  The meaning of home in a personal and larger scale is very important to me and frequently makes appearances in my work, either literally or in an abstracted way.
I'm always reminded of a favorite quote from the movie, "Under The Tuscan Sun".  It occurs at the very end of the movie:
 "What are four walls, anyway?  They are what they contain.  The house protects the dreamer.  Unthinkably good things can happen, even late in the game.  It's such a surprise".

The house protects the dreamer.  Oh, how I love this.

With that in mind, I decided to create a whimsical version of my house.

I used two pieces of 140lb hot press watercolor paper.
The left piece will become the background.

The right piece was cut into the shape of a house and covered with 
a variety of washi tape from my (ahem) rather large collection.

I would like to mention that this idea was inspired by a recent blog post for 
Stencil Girl contributing artist Carolyn Dube.

Using two types of paint I covered the background paper.

I used a portion of the "Rafters"  stencil by Mary Beth Shaw from the Stencil Girl line to
create the windows and doors of my little house.


I took several die-cut shapes of Grungeboard and painted them white.

Then, I painted each element individually.

I used Mary Beth Shaw's "Gears" stencil and overlaid it onto the background paper.


I partially-concealed that image with more paint.  The stencil seemed perfect as a 
metaphor for time passing, sort of like the mechanism inside a watch.

Using an old stamp I printed into both the "door" and "window" shapes on the house.


I blotted a bit of contrasting paint on the edge of the house 
(and on the background paper) as I plan to glue the bird over both.


The palm tree and the "104" are significant because they are elements of my current home.
In addition, prior to glueing the house to the background I used a leaf stamp on both edges of the background paper.  Birds, the garden, color, and a bit of dreaming:  these are very important 
components of my house, my home.
The house truly does protect the dreamer.

If you haven't done so already I hope you will stop over to the Sketchbook Challenge blog for my companion post on this subject.  Thanks for stopping by!  Please leave a comment to be eligible for a drawing!  Cutoff for the drawing will be 5:00 pm CDT on September 20th.  


Monday, September 9, 2013

Abandoned Property and Broken Windows

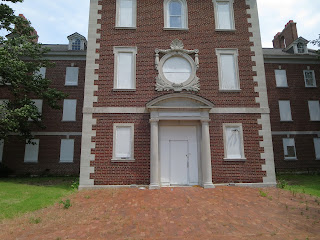
I thought I would share some photos I love from a trip I made to Kansas in June.  I wandered onto the old Menninger Clinic grounds which, until a few years ago, existed in Topeka Kansas.  The grounds are beautiful and the old buildings need someone to restore them and love them up.  My friend Billie lives fairly close to the property and we decided to take a wander during my last visit to my hometown.


the old Tower Building

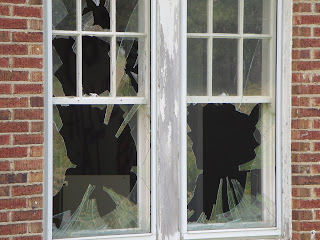
All boarded up because of the damage from vandals over the years.


The wildflowers (coneflower!) in the meadows surrounding the old buildings


There is something about this place that holds a deep attraction.  I hope that someone, someday, brings this beautiful property back to life.  I love it, even in its current state of decay and disrepair.