Friday, May 28, 2010

Alliance for American Quilts fundraising event

I just finished my 16-inch square donation quilt for the Alliance for American Quilts.  These quilts will be auctioned off in increments on eBay.  Funds raised help support the mission of the Alliance, which is to preserve the history of quilts and the artists who make them.  If you have ever heard of "Quilters:  Save Our Stories" then you know about the Alliance.  Unfortunately, some people do not associate this activity with the organization who spearheads it.

My quilt was originally a different size, created for something that has come and gone.  I decided to revise it and try a different method of binding.  Kathy York told me the rudimentary technique of this binding.  Clearly, I need some practice, but it was satisfactory for this small piece.
"Nine Patch Revisited"


corner detail


Here's the back, sleeve and all.
I'm pretty vain about my quilt backs so it hurts just a bit to see the
imperfections.  Let's call it an exercise in humility....


Tuesday, May 25, 2010

Soy Wax Crayon/Hot Procion-infused wax workshop

Last weekend I participated in the first-ever prototype workshop, taught by Lisa Kerpoe and Jane Dunnewold, to explore their newly developed techniques of using Jane's soy wax crayons and Lisa's hot colored soy wax batik workshop.
Jane has developed a proprietary wax formula to make ProcionMX crayons.  Lisa and Jane, together, developed some uses for these as well as dye-infused soy wax used for batik, and another version for stenciling.
It was so exciting to explore some of the possibilities these new tools will provide.  I'm itching to get back into the dye studio and push some ideas forward.  This was my first experience with steaming versus "batching" cloth.  Steaming is required for these techniques.  We all learned a few things along the way about steaming.
Here are a few photos from the weekend:
Jane (L) and Lisa introduce the methods of working 
with these new processes


Jane prepares a bundle of samples for the steamer


One of our two steamers at work


Stamping hot ProcionMX infused wax onto cotton


Cotton silk blend with rubbings and monoprinting


silk habotai, stenciled with red wax, then hand-painted with thinned charmeuse colored procionMX


silk jacquard, hand-painted with hot colored wax, then hand-painted with slightly thickened procion MX


posing with my samples (I was very hot & sweaty, and one week post-op!)

See My Artist Profile on our Dinner At Eight blogspot as part of BTS!


http://dinnerateightartists.blogspot.com/

dinnerateightartists.blogspot.com
2. What is your creative process? I spend a lot of time looking at things that interest me. I’m obsessed with the effects of pressure upon objects & materials, such as a pile of river rocks, cracks in pavement, earth, and buildings. ...

Saturday, May 15, 2010

Quite a week!

I had my gall bladder removed yesterday:  good riddance!  That's why I haven't posted in a while.
I was in and out of the hospital in 8 hours:  my kind of hospital visit.

I'm sore today, but mending.  I think I'll be back in the saddle in just a few days.
I will not be missing that optional organ.  Pooey!

Sunday, May 9, 2010

Mother's Day greetings

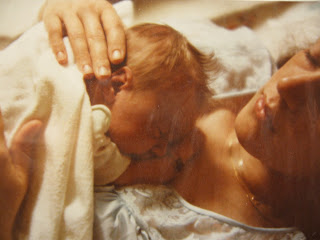
Here's the day I became a mother:
May 15, 1983

Here's to all the woman in my life:  my late mother, my late sister, my lovely/gorgeous/smart daughters, 
my fantastic mother and sisters-in-law, and to all my amazing women friends.  


Top to bottom:   oldest to youngest


Wednesday, May 5, 2010

CREATE registration is now open!


Cloth Paper Scissors Today
CREATE Registration Now Open!


Create logoI'm so excited to finally announce that registration is open! Join us for CREATE, the first annual Cloth Paper Scissors Retreat, August 25-29, 2010, at the Rosemont Hotel O'Hare in Rosemont, Illinois (just outside of Chicago).
create websiteI know you've all been waiting patiently to see what we have in store for our first-ever CREATE with Cloth Paper Scissors art retreat. The website has all the information you need to know about travel, accommodations, workshops, instructor bios, events, and schedules.
We're also really looking forward to the Artists' Faire which takes place from 6:00-9:00pm on Friday, August 27th. This is your opportunity to shop for interesting and unique supplies, and one-of-a-kind artworks from Artist Instructors, local and national artists and more.
video for registration
Registration is now open for those who want to sign up for the full package thatallows you to select a Workshop in each time slot: Wednesday, Thursday, Thursday Night, Friday, Saturday, Sunday, and also includes admittance to Artists’ Faire and Mixed-Media Mixer. The price for the Full Package is $595 through May 11, 2010. The one-time registration fee of $45 is waived with this option. After May 11, the Full Package price is $635. Kit fees vary by class and are in addition to the class registration cost.
Those interested in the Pay-Per-Class option (or as I like to call it, A La Carte) can start registering on May 12th.

Location

The retreat takes place at the Rosemont Hotel at O'Hare, just outside of Chicago, which makes for easy travel planning and we have secured a great rate for the weekend.

Kelli PerkinsInstructors
The Artist Instructor bios are all available on the site so you can see and read about each one. Our instructors have a wide range of talents and accomplishments, including many with Cloth Paper Scissors articles, books, gallery shows, and DVD workshops. Our Artist Instructors will fill your retreat with inspiration, knowledge, and a whole lot of fun. The hardest part of attending is choosing which workshops you want to take—and with the Artist Instructors we have teaching at CREATE, we didn't make that an easy job.
Linda BlinnWe have a ton of great artist instructors like Kelli Perkins, Robert Maloney (our profiled artist from the May/June issue), Cheryl Darrow, Jane LaFazio, andJulie Fei-Fan Balzer.
Alisa BurkeYou also have the opportunity to take workshops from Sue Pelletier, Jane Salley, Barbe St. John, and Linda Blinn.
And if that's not enough, we also have workshops by Jane Dávila, Debbi Crane, Leighanna LightandAlisa Burke.


pokey's workshopWorkshops

The CREATE website has a FAQ page to answer all of those questions that will come up as you ponder which wonderful classes you want to take. Classes like Pokey Bolton's Printapalooza or my Wonderful World of Gelatin Printing workshop.
Other workshops include:
  • Birdscapes by Sue Pelletier
  • Making Fabric Paper by Beryl Taylor
  • Mix Your Media With Photoshop by Natalya Aikens
  • Soy Wax Batik with Paint by Melanie Testa
  • Passport to Journal by Dawn Sokol
  • Tea & Ephemera Fabric Collage by Judy Coates Perez
Jenn's workshopNo matter what medium you like to work in, we have you covered. This is also a great time to dabble in a new medium under the tutelage of some of the country's best mixed-media artists.
Register today and save!

We are gearing up for a wonderfully inspiring trip to the Windy City and can't wait to see you there!
Cheers,

Tuesday, May 4, 2010

Registration will open online May 12th for CREATE! Come join us!


CREATE with Cloth, Paper, Scissors!

Jamie Fingal and I will be teaching two classes; Wednesday, August 25th - 6-hour class "Dreaming in Canvas: A Painted Quilt.  Students will paint primed canvas and then make a one of a kind 12" square art quilt out of a section of the painted canvas and Thursday, August 26th - a 3-hour class at night "Musical Chairs:  A Painted Canvas Collaboration".  

At the Rosemont Hotel - Just outside of Chicago.  Registration for CREATE begins on May 12th.  Join us and many other talented mixed media artists including - Natalya Aikens, Pokey Bolton, Alisa Burke, Jane Davila, Jane LaFazio, Jenn Mason, Susie Monday, Judy Coates Perez, Kelli Perkins, Beryl Taylor, Melanie Testa and more!

I'm a MistyFuse(r)


How cool is this?

Sunday, May 2, 2010

Fusing a large piece of sheer cloth with MistyFuse fusible

After dyeing and pressing my large (3 yards long by 54 inches wide) piece of satin organza, I needed to apply fusible before shipping it to Austin.  I thought I would share my technique for fusing a large piece of sheer cloth with no "lines" or wrinkled fusible.

First, I have a wide ironing board, but this would be so much better if done on a larger, squared-off pressing surface.  Someday I will make a dedicated ironing surface for this very thing.

I'm fusing from a 20 inch roll of MistyFuse.  I think fusing lengths of cloth off a roll is easier, but any situation will work.  The important thing is to have two large teflon sheets or two lengths of parchment that are larger than the width of the roll of fusible.

I begin with the cloth hanging over the opposite edge of my ironing surface from where I am standing.  With organza, since it is a little squirrely before being stabilized, I pin the leading edge to the ironing board and line up the edge of the cloth parallel to the edge of the unrolled fusible.  Once the first section has been fused, it becomes easier to work with.

I fuse from the right edge of the fabric first.  I have already fused the entire length of the cloth, turned it 180 degrees, and now I'm fusing the second length.
It didn't occur to me to photograph the process until this point!
Note that I have the fusible positioned so it is resting, or almost teetering, over 
the edge of the ironing board.  

A teflon Goddess sheet is both under and over the cloth fusible sandwich.  These are available for purchase from MistyFuse!  I go close to, but not up to the edge of my pressing area.  Allow the fusible to cool completely before attempting to separate the pressing sheet from the fusible.  I recommend moving from the right edge, and peel the edge carefully before anything else.  I pull the teflon directly back upon itself to minimize lifting of the fusible.


Once the teflon has been removed, I carefully move the entire piece of cloth
and the roll of MistyFuse, forward on the ironing board.
Remember to allow cooling before doing this.
MistyFuse is very sheer, and therefore a bit more susceptible to heat exposure radiating up from the pressing surface.  Once you get the rhythm, it becomes second-nature!

Now I'm rolling the MistyFuse onto the sheer.
(Note:  I have already done the first length, and now I've turned the cloth around and continue to work from the right edge.  I'm "matching" up the edge of the previous length of fusible to the newly rolled out edge, on the left.  Good lighting on the area is very helpful.  I'm trying to minimize any gaps or overlays in the fusible. 


After matching the left edge to the already fused sheer
I lay the Goddess sheet in place

I move from center to edge, both directions, moving the iron continuously

Here is the cloth, fused side up.
The fusible side of a sheer will always have more "sheen".
The other side will look just as though it has no fusible under it.

MistyFuse is an amazing product for any type of cloth, but the best thing about it is how it behaves under sheers.  There is nothing else like it.  Here is an example of a quilt I made using MistyFuse.  This quilt has so much more depth because the beautiful sheers allow the viewer to see deeper.


The dark pieces are organza with MistyFuse.
Take a look at the detail because you simply cannot see the sheer beneath!


Earlier, I stated that I like to minimize gaps and overlays in the sheer.  Here is a specific circumstance when this is an issue.  This is an extreme demo to show how amazing MistyFuse really is:

First, I fused two squares of MistyFuse to overlap one another in the center on the bronze organza, and I placed it in my window to back-light it:


The areas where the second strip of organza is fused make the MistyFuse invisible!
The only area that you can see the MistyFuse is the single layer of organza, and this is under extreme conditions.
The next image is the same piece of cloth without the back-lighting:


As you can see, the MistyFuse, even though there is an obvious size differential, virtually disappears.
The next image is of the purple organza, seen in the above image.
This cloth is a single sheer with 6 smaller pieces of organza fused to it with MistyFuse:


This is pretty crude and quickly slapped together, but you can see the gorgeous possibilities
where a sheer is exposed to back-lighting.  Wow!

Here is a link to the website.  Please tell Iris I sent you!

Satin Organza

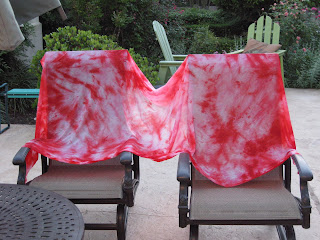
tray-dyed with scarlet Procion MX dye, still wet


dry, but un-ironed


ironed detail

While at the SAQA/SDA conference in March I purchased several lengths of cloth I had not worked with before, and this is one of them:  satin organza.  It has a higher momme (14mm) than the more traditional organza.  I'm not even sure that is the proper way to describe it, but I can tell you that it has a heavier "hand" than traditional organza, and there is a certain extra tactile quality.  This will be used to serve to stabilize the back of a collaborative quilt that has oodles of small pieces.  Each of said small pieces has a distinct mark which denotes the maker.  In using the organza we hope that these marks will ghost through the sheer.  We'll see.......