Check out all the fabulous ideas on Julie's blog!
I have been playing with Julie Fei-Fan Balzer's "Flower Piecing" stencils in both 12x12 inch and 6x6 inch sizes. I love having the same stencil in two sizes because varying the scale of the mark adds a lot of depth and interest to the surface.
To play with these stencils I decided to pull out a variety of surfaces on which to experiment: baby wipes, sale tags, watercolor postcards, and polyester organza that had previously been laminated with paper (as well as gelatin printed and stamped). With the exception of the sale tags these things had some paint on them and were "languishing" in my studio.
First up: the baby wipe. These had been hit with some acrylic paint when wet and allowed to dry. I didn't bother pressing them flat. I like the slight imperfections that I may (or may not) get by working with a slightly wrinkled surface, but I'm crazy that way. Iron your surfaces flat if that is how you roll.
The large stencil is placed over the baby wipe. I'm working on a slightly padded surface that has been covered with a drop cloth.
On a paper palette, I placed a small amount of both blue and bronze acrylic paint.
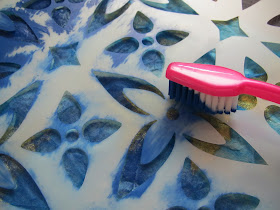
And, as you can see, I'm using an old toothbrush as my stencil brush. I love using these!
I just want to pick up a small "dab" of the paint, and by working on this paper palette first I can pounce off excess before approaching my work surface.
See how the toothbrush gives a nice, soft look to the mark? Love!
Next, I have a watercolor postcard that I had previously marked with water-soluble crayons, over-screened with matte medium to make it permanent. I'm not crazy about this postcard. Things like this are perfect for experimentation because they don't feel "precious".
I plan to work back into this after the paint dries.....
I love making paper-laminated sheer! It would take too long to explain (in this post) how to do it, but there are a number of good resources, not the least of which is my DIY Surface Design dvd (shameless self-promotion disclaimer). Jane Dunnewold has a great book about lamination, which I highly recommend. This piece is left over from a previous project, and was used for a gelatin plate printing demo at one time so there are a lot of marks on the surface already. Yay! More is more....
I'll use more paint colors..
Using an acrylic brush this time, I am moving over a portion of the
surface alternating colors.
These colors are faint over the bolder blue in the background.
I'm fine with that.
I intend to outline some, or all, of the stenciled areas with a permanent marker.
I used a Pentel Gel Roller Fabric pen to outline, and create more, of the shapes in the stencil.
The dark edge brings the shape forward on the surface.
So much fun!
Don't forget that sometimes an opaque light color works well over a dark(er) background:
Think how interesting this laminated sheer would be with backlighting?
Wow! It could be a really cool window treatment!
Here is my blank sale tag:
First, I stenciled with the large pattern, then drew around it with a gel pen.
Next, using the small stencil, I stenciled across a portion of the surface with my trusty toothbrush.
...and I did the same on this baby wipe.
Note the larger pattern is in the background with white opaque paint.
Look how soft and lovely this image is when used with a leaf-green paint:
Oh my!
You, too, can make a "happy mess"!
These samples will eventually find their way into my work: fusible added to the cloth and appliqued to a quilt surface. Postcards will be mailed. Sale tags will be further embellished and used in a wide variety of ways, including as gift tags, as a book mark, or in my sketchbook.
I haven't even broached the subject of acrylic inks and all the possibilities with those. Stay tuned for more fun! Thanks for stopping by. I hope you try these great stencils: I think you will like using them!
Please visit these participants in the stencil blog hop:
Julie Fei-Fan Balzer
http://balzerdesigns.typepad.com/balzer_designs/2012/06/stencil-hop-flower-piecing.html
Tammy Tutterow
http://tammytutterow.typepad.com/


These are such creative uses of the stencils,your techniques are very interesting and so creative!!
ReplyDeleteWOW! that's a lot of great options to get messy with. Now I am inspired to get a little messy!
ReplyDeletefun ways to sue the stencil. Like all your different backgrounds.
ReplyDeletegreat post! I love all the layering and the toothbrush is brilliant.
ReplyDeleteLove how you used remnants/scraps from other projects and so many different types of things. I gotta start saving those baby wipes! I'll be curious to see what became of all of these!
ReplyDeleteWow! So many ideas. The softness you've achieved is gorgeous and I love the layered look.
ReplyDeleteYou've certainly opened my eyes to grabbing all sorts of substrates and just playing with them using the stencils-thank you!
ReplyDeleteI'm so glad you dropped by and left a comment. I hope you will come back often and let me know what you are playing with!
ReplyDeleteLeslie -- what impressive results from stencils -- the pieces have depth and character, texture and color. Thank -- this looks like fun.
ReplyDeleteI like how you experimented with things you were not in love with so they were not too precious...(I think your postcard got "better"!)....and I liked the two sizes of stencil used together~ great work!
ReplyDeleteyour work is very impressive, and insperational, I am going to try some of your technices, thanks for the post and showing your work, great job....
ReplyDelete